To quickly tackle seasonal home maintenance problems, start by sealing drafty windows and doors with weatherstripping and caulk to cut energy loss. Clear gutters and downspouts to prevent water damage, and fix leaky faucets promptly to save water and avoid future repairs. Prepare your heating system before winter by changing filters, and insulate attics and crawl spaces effectively. For more simple fixes to keep your home comfortable year-round, keep exploring these essential tips.
Key Takeaways
- Regularly inspect and reseal gaps around windows, doors, and attic hatches to prevent heat loss and drafts.
- Clean and maintain gutters to avoid water damage and ensure proper drainage during seasonal changes.
- Change or clean HVAC filters, and schedule professional inspections for winter preparedness.
- Seal leaks and drafts around vents and radiators for efficient heating and energy savings.
- Perform quick fixes like tightening loose fixtures, cleaning filters, and inspecting for leaks to maintain home safety and efficiency.
Sealing Drafty Windows and Doors Quickly
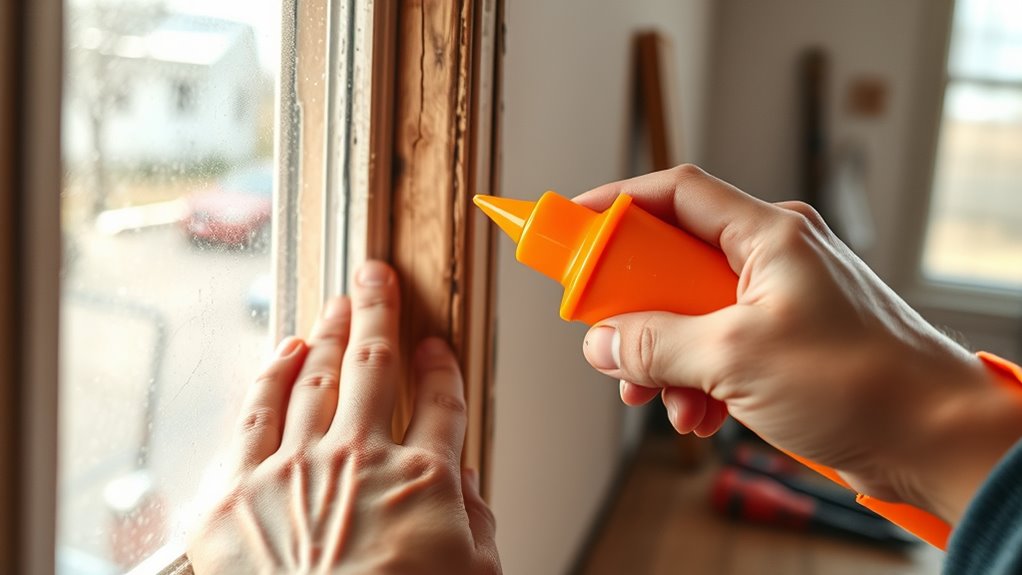
When you notice drafts around your windows and doors, addressing them promptly can make a big difference in your home’s comfort and energy bills. Start with simple window insulation methods like applying weatherstripping or using draft stoppers. These quick fixes help prevent drafts from seeping in and improve draft prevention. For doors, install draft snakes or seal gaps with removable seals to keep cold air out. You can also add plastic film over windows for an extra layer of insulation during colder months. Additionally, understanding the concept of Free Floating can guide you in selecting the most effective insulation strategies. These solutions are fast, affordable, and effective, making your home more comfortable and energy-efficient. By sealing drafts early, you reduce heat loss and lower your heating costs, ensuring your home stays cozy all season long.
Clearing Gutters and Downspouts in Minutes
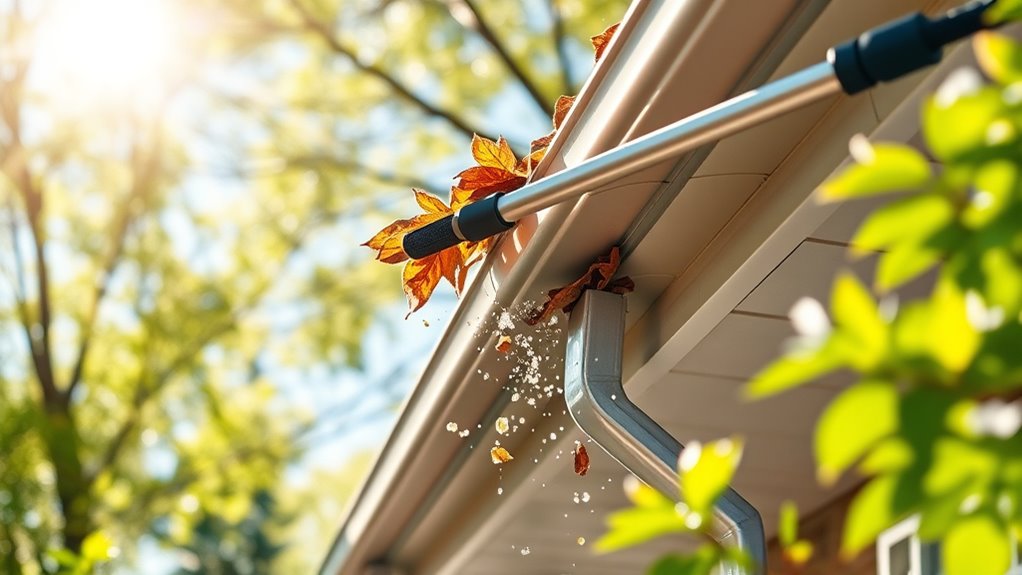
Clearing your gutters and downspouts quickly is essential to prevent water damage and keep your home protected during the rainy season. To do this efficiently, start with fall leaf removal to prevent buildup. Next, consider gutter guard installation to reduce future clogs. When cleaning:
- Remove debris by hand or with a scoop.
- Flush gutters with water to clear remaining dirt.
- Check downspouts for blockages and clear as needed.
- Secure gutters and install gutter guards for easier maintenance.
Doing these steps in minutes keeps water flowing freely and minimizes the risk of water damage. Gutter guard installation is an investment that saves you time and effort later, especially during fall when leaves are most likely to clog your system. Stay proactive and protect your home.
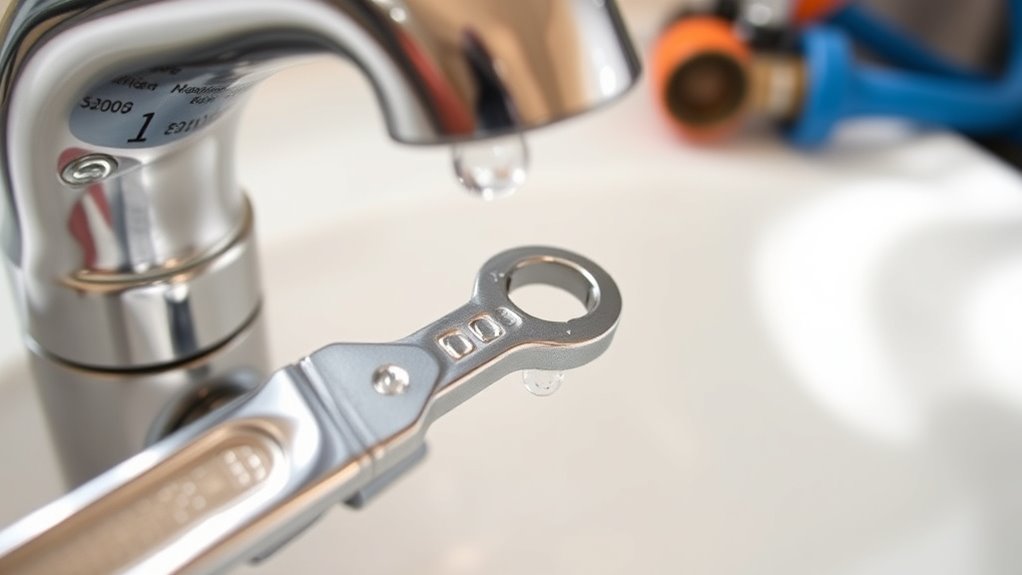
Fixing Leaky Faucets and Plumbing Drips
Leaky faucets and dripping pipes are common issues that waste water and increase bills. You’ll need to identify the most frequent leaks and gather the right tools for quick repairs. Regular maintenance can prevent future drips and keep your plumbing running smoothly. Using natural remedies like essential oils for plumbing issues, such as tea tree oil’s antimicrobial properties, can sometimes help address minor problems or improve overall plumbing health.
Identifying Common Leaks
Identifying common leaks is the first step in preventing water waste and avoiding costly damage. Start by inspecting your home for signs of leaks, such as water stains or mold. Focus on these areas:
- Check for damp spots or water stains on ceilings and walls, which could indicate a roof leak.
- Look for dripping or puddles around appliances and fixtures to detect pipe leaks.
- Listen for the sound of dripping water, especially in quiet areas.
- Examine faucets and pipes for visible drips or corrosion.
- Remember that leak detection techniques can help pinpoint hidden leaks not immediately visible to the naked eye.
Tools for Repairing Drips
Once you’ve spotted signs of leaks, fixing them becomes the next priority. For effective drip repair, you’ll need the right tools. A adjustable wrench helps loosen fittings, while a flat-head screwdriver is essential for removing aerators and handles. A leak detection kit can pinpoint hidden drips, saving time and effort. Replacement parts like washers, O-rings, or cartridges are often necessary for a complete fix. A cloth or small bucket catches excess water during repairs. Using these tools ensures you can quickly identify the source of the leak and make necessary repairs. Properly addressing leaks not only saves water but also prevents further damage. Understanding emotional support can be beneficial when dealing with stressful repair situations. Keep your toolbox stocked with these essentials for fast, efficient leak detection and drip repair whenever leaks appear.
Preventive Maintenance Tips
Regularly inspecting your faucets and plumbing can prevent small leaks from turning into costly repairs. Leaks waste water, increase your bills, and can cause water damage. To keep leaks at bay, consider these tips:
- Tighten fittings and replace worn washers promptly.
- Use outdoor sealing techniques around faucets and pipes to prevent drafts and water intrusion.
- Install energy-efficient windows to reduce temperature fluctuations that stress plumbing.
- Check for signs of corrosion or mineral buildup, which can cause drips.
- Remember that Fatherhood teaches patience and attentiveness, qualities that can help you stay proactive in home maintenance.
Maintaining your plumbing also improves overall home efficiency. Proper sealing around windows and doors minimizes drafts, reducing strain on your plumbing system during seasonal changes. Regular inspections and quick fixes save money and extend your home’s lifespan.
Preparing Your Heating System for Winter

As winter approaches, it’s essential to guarantee your heating system is ready to keep your home warm and safe. Start by changing or cleaning your filters to improve energy efficiency and airflow. Schedule a professional inspection to ensure all components function properly and prevent costly breakdowns. Adjust your thermostat settings to optimize comfort and save energy; setting the thermostat a few degrees lower when you’re away or asleep can make a big difference. Consider installing a programmable thermostat for better control and efficiency. Clear vents and radiators of obstructions to ensure even heat distribution. Finally, check for any leaks or drafts around doors and windows, and seal them to prevent heat loss. Proper preparation keeps your system running smoothly and helps you conserve energy throughout the winter. Additionally, understanding the importance of contrast ratio can help you choose a more effective heating display or indicator to monitor your system’s performance.
Insulating Attics and Crawl Spaces Effectively

After ensuring your heating system is functioning properly, focusing on insulation becomes the next step to maximize energy efficiency. Properly insulating your attic and crawl space prevents heat loss and keeps your home comfortable. Start by sealing gaps around vents, pipes, and wiring with caulk or foam insulation to eliminate drafts. Then, consider these key steps:
- Install foam insulation in attic gaps and crawl space vents to improve thermal resistance.
- Add insulation batts or spray foam to attic floors and crawl space walls for added protection.
- Seal gaps around windows and doors leading to these areas to prevent air leakage.
- Regularly check for and seal any new gaps or cracks to maintain insulation effectiveness.
- Be aware that improper insulation and sealing can contribute to increased air pollution and climate change, highlighting the importance of sustainable practices in home maintenance.
This approach reduces energy waste and saves money on heating bills.
Maintaining Lawn and Garden Equipment Before Storage
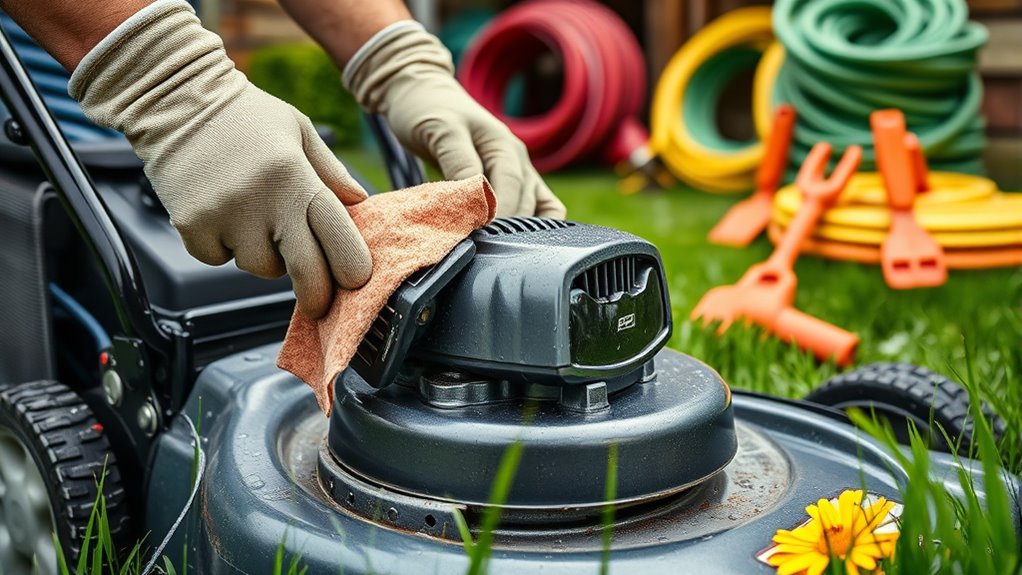
Before storing your lawn and garden equipment, make sure to clean everything thoroughly to prevent rust and buildup. Drain the fuel completely to avoid leaks or engine problems later on. Don’t forget to lubricate moving parts to keep them in good shape for next season. Incorporating proper cleaning techniques can help preserve equipment longevity and performance.
Clean Equipment Thoroughly
To guarantee your lawn and garden equipment stays in top shape through the off-season, you need to clean it thoroughly before storing. Start with power washing to remove dirt, grease, and debris, especially from blades and vents. Then, follow these steps:
- Wipe down all surfaces with a damp cloth to eliminate remaining grime.
- Clean air filters and spark plugs to prevent buildup.
- Remove any grass or mud from blades and wheels.
- Dry all parts completely to prevent rust and corrosion.
Proper cleaning ensures your equipment remains in good condition and makes maintenance easier later. Power washing is particularly effective for deep cleaning, while thorough drying helps with equipment storage, ensuring everything is ready for the next season without damage or buildup.
Drain Fuel Properly
Have you ever started your mower only to find it sputtering or failing to start the next season? Properly draining fuel before storage is essential for good engine maintenance. Old fuel can cause clogs, gum buildup, and corrosion in your fuel system. To prevent this, run your equipment until the fuel tank is nearly empty, then add a fuel stabilizer and run the engine a few minutes. Store the equipment in a dry, cool place. Using fuel stabilizer helps maintain the quality of the remaining fuel and prevents issues during the next season.
Lubricate Moving Parts
Lubricating moving parts is essential to keep your lawn and garden equipment in good shape during off-season storage. Proper lubrication prevents rust, reduces wear, and ensures smooth operation when you’re ready to use your tools again. Focus on key components like door hinges and garage door rollers, which experience frequent movement. To do this effectively: 1. Clean the parts to remove dirt and debris. 2. Apply a suitable lubricant, such as silicone spray or WD-40. 3. Work the lubricant into hinges and rollers. 4. Wipe away excess to prevent dirt buildup. Regularly inspecting sprayer components can help identify potential issues early and extend the lifespan of your equipment.
Checking and Replacing Weatherstripping

Is your weatherstripping still sealing your home effectively? Over time, gaps can develop around your storm door or attic hatch, letting drafts in. To check, gently press along the edges; if you feel air or see cracks, it’s time to replace. Use a utility knife to remove old weatherstripping and install new foam or rubber strips for a tight seal. Here’s a quick snapshot:
| Location | Common Issue | Solution |
|---|---|---|
| Storm door | Gaps or cracks | Replace weatherstripping |
| Attic hatch | Air leaks | Install foam gasket |
| Window frame | Missing or worn seals | Apply new weatherseal |
| Basement door | Drafts | Add weatherstripping |
Regular checks save energy and keep your home cozy.
Simple Repairs for Squeaky Floors and Loose Tiles

Squeaky floors and loose tiles can be both annoying and a safety hazard, but fixing them is often straightforward. To stop floor squeaks, identify the source and use these steps:
- Locate the squeak by walking over the floor.
- Drill a small pilot hole through the subfloor at the squeak point.
- Insert a screw or shim to tighten the floor joist.
- Fill the hole with wood filler once fixed.
For loose tiles, try this simple fix:
- Clean the tile and surrounding area thoroughly.
- Apply a strong adhesive or thin-set mortar underneath.
- Press the tile firmly into place.
- Allow adhesive to dry before walking on it again.
Frequently Asked Questions
How Often Should I Inspect My Home for Seasonal Maintenance Issues?
You should inspect your home at least twice a year, ideally in spring and fall, to keep up with seasonal maintenance issues. Follow a regular inspection schedule and use a maintenance checklist to make sure you don’t miss key tasks like checking gutters, sealing windows, and inspecting the roof. Staying proactive helps prevent costly repairs later and keeps your home safe and comfortable year-round.
What Tools Are Essential for Quick Home Repairs?
Imagine you’re a handyman superhero, ready for quick fixes. You’ll need a power drill for fast screw-driving and an adjustable wrench for gripping various bolts. These tools are your utility belt essentials, helping you tackle leaks or loose fixtures swiftly. Just like a superhero’s gadgets, having a reliable power drill and adjustable wrench on hand makes your home repairs easier, saving you time and frustration.
Can DIY Fixes Prolong the Lifespan of Home Systems?
Yes, DIY fixes can prolong the lifespan of your home systems by maintaining home safety and improving energy efficiency. Regularly addressing minor issues prevents them from worsening, saving you money and reducing repair costs. For example, fixing leaks or sealing drafts keeps systems running efficiently, preventing damage and ensuring safety. By staying proactive with simple repairs, you help extend the life of your home’s essential systems and maintain a comfortable, secure environment.
How Do I Identify Hidden Damages Before They Worsen?
Like Sherlock Holmes with a magnifying glass, you should start by inspecting your home carefully. Use inspection tips such as checking for water stains, cracks, or mold, which are damage indicators. Look behind appliances, under sinks, and in hidden corners. Don’t ignore small issues; they can signal larger problems. Regular inspections help you catch hidden damages early, preventing costly repairs and extending your home’s lifespan.
When Should I Call a Professional Instead of DIY?
You should call a professional when DIY safety becomes a concern or if the damage seems beyond your skills. For example, tackling electrical, plumbing, or structural issues can pose risks and might lead to costly mistakes. While DIY can save money, professional costs are worth it for complex repairs. Trust your judgment, and don’t hesitate to seek expert help when safety or repair complexity is at stake.
Conclusion
Think of your home as a well-tuned orchestra, where each repair is a vital note. When you quickly address drafts, leaks, and insulation, you’re tuning your space for a harmonious season ahead. Just like a conductor ensures every instrument plays in sync, your swift fixes keep your home running smoothly. With each small repair, you’re composing a cozy, efficient sanctuary ready to face whatever the season brings.