

This guide provides clear, step-by-step instructions for installing and using a garden hose reel. It is designed for homeowners or gardeners new to hose reel setup, aiming for a tidy, accessible watering system. The process involves selecting the right reel, installing it securely, and properly winding and unwinding the hose for best performance. Expect to spend about 30 to 60 minutes completing this task, depending on your familiarity with basic tools.

Get garden gear delivered free with Prime
- Fast, free delivery on millions of items
- Prime Video, Amazon Music and more included
- Member-only deals all year
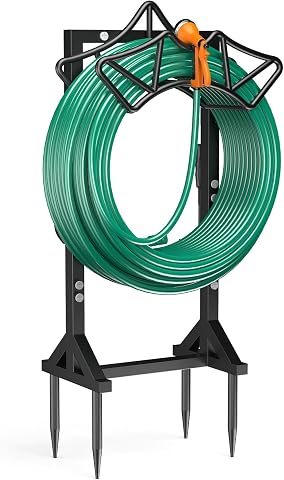
Garden Hose Holder with 2 Tool Hooks Heavy-Duty Water Hose Reel Rustproof
- ✔ Capacity: 160 ft / 160 lbs
- ✔ Material: Stainless steel hardware, rust-proof finish
- ✔ Base: Square base with deep-grip spikes

Giraffe Tools Retractable Garden Hose Reel 1/2" 130FT Wall Mount Auto Rewind
- ✔ Hose Length: 130 ft
- ✔ Hose Diameter: 1/2"
- ✔ Lead Hose: 5 ft

Artigarden Garden Hose Reel Cart with Wheels, Outdoor Water Hose Cart Black
- ✔ Hose Capacity: 165 ft
- ✔ Hose Diameter: 5/8 inch
- ✔ Leader Hose Length: 3.9 ft
Difficulty: Beginner | Time: 30-60 minutes
What You’ll Need
Tools & Materials:
- drill
- screwdriver
- measuring tape
- level
- wrench or pliers
- hammer (if needed)
Knowledge:
- basic tool use
- understanding of wall or ground mounting locations
Choose a location that is easily accessible, close to your water source, and at a height that makes winding and unwinding comfortable. Confirm the wall or ground surface is suitable for mounting or placement. Measure the space available before purchase to ensure the reel fits.
Garden Hose Holder with 2 Tool Hooks Heavy-Duty Water Hose Reel Rustproof
<p>This heavy-duty hose holder stands out for its impressive capacity—able to hold up to 160 feet of hose without kinking—making it ideal for large backyard setups. Its <strong>rust-proof finish and durable stainless steel hardware</strong> ensure longevity in outdoor conditions. The stable square base with deep-grip spikes offers excellent anchoring, especially on uneven ground, although setup may require some ground preparation. Compared to wall-mounted options, this reel provides greater flexibility in placement, but it might be less sleek and portable.</p>
Pros:
- High capacity to hold large, heavy hoses
- Stable and secure with anchoring spikes
- Weather-resistant and durable for outdoor use
- Includes convenient tool hooks and hose groove
Cons:
- May require ground preparation for best stability
- Setup might be challenging on very hard or uneven ground
Best for: Buyers with large hoses or those who need a permanent, heavy-duty storage solution.
Not ideal for: Gardeners looking for wall-mounted convenience or lightweight portability.
Bottom line: Excellent for heavy-duty, permanent hose storage in large outdoor spaces, with some ground prep required.
“Excellent for heavy-duty, permanent hose storage in large outdoor spaces, with some ground prep required.”
Giraffe Tools Retractable Garden Hose Reel 1/2" 130FT Wall Mount Auto Rewind
<p>This retractable reel excels in convenience, featuring an <strong>auto rewind system that prevents kinks and tangles</strong>. Its 130-foot hybrid hose with lockable length offers versatile watering options, while the sturdy aluminum reel and 180° swivel wall mount provide durability and flexibility. However, wall mounting requires dedicated space and proper anchoring, which might not suit all gardens. Compared to free-standing options, it offers a clean, organized look but limits placement options to walls.</p>
Pros:
- Automatic rewind system prevents kinking and tangles
- Lockable hose length for precise watering
- Durable all-weather hybrid hose
- Easy to install with quick-release feature
Cons:
- Requires wall mounting space
- May need a sturdy post for additional stability
- Limited to wall-mounted installation
Best for: Gardeners seeking a tidy, space-efficient solution with versatile spray patterns.
Not ideal for: Those without suitable wall space or who prefer portable, mobile solutions.
Bottom line: Ideal for organized, space-saving watering in gardens with suitable wall space, sacrificing portability for neatness.
“Ideal for organized, space-saving watering in gardens with suitable wall space, sacrificing portability for neatness.”
Artigarden Garden Hose Reel Cart with Wheels, Outdoor Water Hose Cart Black
<p>The Artigarden hose reel cart makes <strong>extensive watering effortless</strong> thanks to its 165-foot capacity and durable metal construction. Its <strong>easy mobility</strong> is a key advantage, with sturdy wheels and an ergonomic height, making it suitable for larger properties. However, the weight when fully loaded can be a drawback, and assembly is required before use. Compared to wall-mounted or stationary options, this cart offers unmatched flexibility but at the cost of size and weight.</p>
Pros:
- Large 165 ft hose capacity for extensive watering
- Durable weather-resistant metal construction
- Easy mobility with sturdy wheels and ergonomic handle
- Effortless winding with ergonomic crank and non-slip handle
Cons:
- Hose not included in the package
- Requires assembly before use
- Heavy when fully loaded
Best for: Large gardens or properties needing frequent hose repositioning, especially when mobility is a priority.
Not ideal for: Small yards or those preferring a compact, wall-mounted system.
Bottom line: Best suited for those who need a large, mobile solution for extensive outdoor spaces, accepting some weight and setup effort.
“Best suited for those who need a large, mobile solution for extensive outdoor spaces, accepting some weight and setup effort.”
As an Amazon Associate we earn from qualifying purchases.
Before You Start
Ensure the area where you plan to install the reel is free of obstructions and has access to a water source. Gather all tools and materials listed. Read the manufacturer’s instructions specific to your hose reel model to understand mounting points and any special requirements. If mounting on a wall, check that the wall can support the weight of the reel, especially when filled with water.
Step-by-Step Instructions
Step 1: Select the installation location
Choose a flat, stable surface near your water source that allows easy access for watering and winding the hose. Use a measuring tape to verify the space is adequate for the reel size. Mark the spot for mounting or placement.
Tip: Avoid locations exposed to direct sunlight for prolonged periods to prevent material degradation. Select a spot with enough clearance for full operation.
Check: You have identified a suitable spot where the reel can be securely mounted or placed, with enough space for full extension and retraction of the hose.
Step 2: Prepare the mounting area
If mounting on a wall, drill holes at the marked points using a drill and appropriate bit. Insert wall anchors if mounting on drywall or masonry. For ground placement, clear a flat area and ensure it is stable.
Tip: Use a level to ensure the mounting bracket will be straight. Double-check measurements before drilling.
Check: Mounting surface is prepared, with holes drilled and anchors installed if needed, ready for the reel bracket.
Step 3: Mount or place the hose reel
Attach the reel to the mounting bracket using screws or bolts supplied. If using a free-standing reel, position it on a flat, stable surface, ensuring it is upright and secure.
Tip: Tighten all screws firmly but avoid over-tightening to prevent damage. For wall-mounted reels, verify stability by gently pulling on it after installation.
Check: The reel is securely attached or positioned stably, with no wobbling or movement when gently pulled.
Step 4: Connect the garden hose
Attach the hose to the reel’s inlet fitting, tightening the connection by hand. Connect the other end of the hose to your outdoor spigot, ensuring a snug fit.
Tip: Use a wrench if necessary to tighten fittings, but avoid overtightening, which can damage threads.
Check: The hose connects securely at both ends without leaks, and water flows smoothly when turned on.
Step 5: Test the installation
Turn on the water supply and check for leaks at the fittings. Wind the hose onto the reel to test retraction and extension. Ensure the reel rotates smoothly without sticking.
Tip: If leaks occur, tighten fittings or replace washers as needed. If the reel is stiff, check for obstructions or misalignment.
Check: Water flows without leaks, and the reel operates smoothly, winding and unwinding easily.
Step 6: Finish and organize
Wind the hose fully onto the reel, avoiding kinks or twists. Store the hose properly, and turn off the water supply. If the reel has a locking mechanism, engage it to keep the hose in place.
Tip: Periodically check for hose wear or leaks. Keep the reel clean and free of debris.
Check: The hose is neatly wound, accessible, and the reel functions reliably for future use.
Common Mistakes to Avoid
- Mounting the reel on an unstable or weak surface — Verify wall strength or ground stability before installation. Use appropriate anchors and hardware for the surface type.
- Over-tightening fittings causing damage — Hand-tighten fittings securely, then use a wrench for a quarter turn if needed. Avoid excessive force.
- Kinking or twisting the hose during winding — Wind the hose smoothly, avoiding sharp bends. Lay the hose straight on the reel and avoid twisting when attaching or winding.
Troubleshooting
Problem: Water leaks at fittings
Solution: Turn off water, disconnect the hose, and re-tighten fittings. Replace washers if leaks persist.
Problem: Reel does not rotate smoothly
Solution: Check for obstructions or debris in the reel mechanism. Lubricate moving parts if recommended by manufacturer.
Problem: Hose does not reach desired length
Solution: Ensure the hose is fully unwound during use. Replace the hose if it has developed kinks or damage.
What Success Looks Like
The hose is securely connected without leaks, the reel is firmly mounted or placed, and the reel rotates smoothly with the hose winding and unwinding evenly. Water flows properly through the hose, and the system is easy to operate.
Next Steps
Regularly check fittings and the reel’s stability. Store the hose properly after each use to extend its lifespan. Consider installing a spray nozzle or additional fittings for watering versatility. Reassess the setup annually to ensure continued safety and performance.
Frequently Asked Questions
Can I install a hose reel on brick or concrete walls?
Yes, use masonry anchors and a drill with a masonry bit to securely attach the reel. Ensure the anchors are rated for the weight of the reel when filled with water.
How do I prevent my hose from tangling or kinking?
Wind the hose evenly onto the reel, avoiding sharp bends or twists. Use a reel that has a swivel mechanism to reduce twisting during operation.
What should I do if the reel does not spin smoothly?
Inspect for debris or corrosion in the reel mechanism. Apply a suitable lubricant if recommended, and tighten any loose components.
How often should I check for leaks or damage?
Inspect fittings and the hose monthly, especially after winter or harsh weather, and repair or replace damaged parts promptly.
Fall yard work Picks
leaf blowers
As an affiliate, we earn on qualifying purchases.