TL;DR

Get garden gear delivered free with Prime
- Fast, free delivery on millions of items
- Prime Video, Amazon Music and more included
- Member-only deals all year
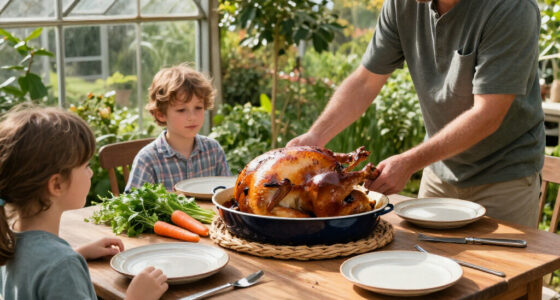
A turkey roasting pan holds the bird and catches drippings during oven roasting; choose one that fits the turkey and oven with room for airflow, has a rigid base and secure handles, and suits your cooking surface and cleanup habits. A rack can lift the bird for better airflow, but it is optional, and a food thermometer—not the pan or the clock—tells you when the turkey reaches 165°F (74°C).
A roasting pan can look roomy on the counter and still jam against your oven walls once its handles are in the way. That small mismatch turns a holiday dinner into an awkward shuffle with a heavy bird and hot drippings. Choosing well means checking the turkey, the pan, and the oven as one setup.
This guide explains how to size a pan, compare materials, decide whether you need a rack, and move a full pan with less risk of spills. You’ll also learn what a roasting pan can—and cannot—tell you about doneness, plus how to turn its browned drippings into gravy. Think of the pan as the sturdy stage for dinner: it supports the show, but the thermometer still calls the final cue.
Measure both the turkey and the oven, including pan handles and vertical clearance, before buying.
Choose a rigid pan with secure handles; support a disposable foil pan with a rigid baking sheet.
A rack is optional: it raises the turkey, while sturdy vegetables can serve as a makeshift support.
Use a food thermometer to check the breast and innermost thigh and wing for at least 165°F (74°C).
Check the manufacturer’s instructions before using a pan on a stovetop, induction cooktop, or dishwasher.
Choose a pan that fits the turkey and your oven
Turkey roasting pans should fit the bird without crowding it and sit level in the oven with room for air to move. Measure the pan’s interior for the turkey and its exterior, including handles, for the oven; a pan that fits one space may not fit the other. Leave enough clearance to position the pan without scraping the oven walls.
For example, if your bird nestles neatly inside a pan but the handles prevent the oven door from closing, the listed capacity has not helped you. Measure the oven rack’s width and depth, then compare those numbers with the pan’s outside dimensions. Also check that the turkey does not press tightly against the pan sides, where it can be harder to brown evenly.
The phrase “a turkey roasting pan holds the” bird and catches drippings sounds simple, but capacity alone does not tell you whether the whole setup works. A taller bird may fit a pan’s footprint and still sit too close to an upper heating element. Check the oven’s vertical room too, especially if you plan to tent the turkey with foil.
Use a tape measure before you shop, and include space to slide the rack in and out. If you’re between sizes, check the turkey’s actual dimensions and your oven layout rather than guessing from a pound rating. A pan that is too small can crowd the bird and make handling awkward; one that is much larger takes up more oven space and may leave drippings spread thinly across its base. Matching the pan to both spaces helps preserve airflow and leaves room to lift it out without scraping or tilting.
Popular right now

Breville Bambino Espresso Machine, Brushed Stainless Steel

De'Longhi Rivelia Automatic Espresso Machine with Grinder and Milk Frother, Beige

KitchenAid Artisan 5-Qt Tilt Head Stand Mixer, Milkshake
As an affiliate, we earn on qualifying purchases.
Pick a material that suits your cooking and cleanup
The best pan material depends on whether you value durability, quick heating, easy cleanup, or a route from oven to stovetop. Stainless steel is durable, and some models can sit on a burner for gravy; aluminum conducts heat well but may react with acidic foods unless coated or lined. Coated and enameled pans can be easier to clean, while their surfaces need care to prevent scratches or wear.
Heavy disposable foil pans make sense when you roast only once or need a lightweight option. Their thin sides can flex under a large turkey, though, so put the pan on a rigid baking sheet before filling it. Imagine carrying a full foil pan across the kitchen: the tray beneath it gives you a firm grip and reduces the chance of hot juices sloshing over the rim. That support also matters when sliding the pan onto an oven rack; a flexing base can shift the bird and spill drippings before you even reach the counter.
Before buying, check the maker’s instructions for stovetop, induction, dishwasher, and temperature compatibility. These features vary by product, even when two pans look similar. A stainless pan that works over your gas burner may not be approved for induction, and an easy-clean coating may call for nonmetal utensils. The tradeoff is practical: a pan suited to stovetop gravy saves transferring hot drippings, while a pan limited to oven use may be simpler or lighter but requires a separate saucepan.
Newer options include ceramic-coated and reusable lightweight pans, alongside traditional heavy metal models. Compare care instructions as carefully as the price. A pan that cleans up quickly is helpful, but it is only a good fit if it also feels rigid and has handles you can hold securely with oven mitts. If you expect to use it often, durability and compatibility can matter more over time than a modest difference in purchase price; for occasional roasting, easy storage or cleanup may be the more useful benefit.
Decide whether a roasting rack is worth the space
A roasting rack raises the turkey above the pan, which can improve airflow around the bird and keep its underside from sitting directly in the juices. You do not need a rack to roast a turkey, but it can make the setup easier to manage. A V-shaped rack cradles the bird; a flat rack leaves more room underneath for vegetables and drippings. The choice affects how easily you can reach those drippings and how much room remains in the pan, so consider whether gravy or a vegetable bed is part of your plan.
Picture a turkey resting directly in a shallow pool of juices: the underside stays wet while exposed areas roast. Raising the bird gives hot air more access around it, though it does not guarantee even browning or make the turkey cook faster. Your oven, recipe, and the bird’s shape still matter. A rack creates space for air and juices to circulate, but it also adds another item to wash and can raise the bird closer to the oven’s upper element.
If you don’t own a rack, arrange sturdy vegetables such as carrots, celery, and onions beneath the turkey. They can lift the bird and flavor the drippings, but they may soften or cook differently from vegetables roasted on their own. For instance, onions under a long roast can turn very tender and dark, which may suit gravy but not a crisp side dish. The vegetables can also occupy space and absorb some drippings, so this approach trades a ready-made support for added flavor and less rack cleanup.
Choose a rack that fits inside the pan without blocking the handles or taking up the entire cooking area. A rack is useful when you want the bird elevated; a vegetable bed is a handy alternative when you want to use what’s already in the kitchen. If neither option fits comfortably, roasting directly in the pan is still workable; expect the underside to contact juices and rely on the thermometer to judge doneness, since elevation does not replace temperature checks.
Move the loaded pan without risking a spill
To move a turkey safely, use a pan with a rigid base and secure handles, set it on a stable oven rack, and get a firm grip with dry oven mitts. A roasting pan filled with a bird and drippings is heavy, so plan the route from oven to counter before you lift. Disposable foil pans need a rigid tray beneath them before you fill or carry them. The risk is not just a dropped dinner: hot drippings can spill onto skin or the floor, so stability and a clear landing spot matter as much as strength.
- Check the fit first. Slide the empty pan into the oven and confirm that it sits level and clears the walls.
- Set up support. Place a rack inside, or prepare sturdy vegetables as a raised base. Put a disposable foil pan on a rigid baking sheet.
- Position before filling. Set the pan on the oven rack, then add the turkey according to your recipe.
- Lift with control. Wear dry oven mitts, hold both handles, and keep the pan level as you move it.
For a small kitchen, clear a landing spot on the counter before you open the oven. That simple step helps when you’re handling a turkey while family members move around nearby. Keep children and pets away from the hot pan, oven, and spilled drippings; the surface and juices can burn even after the turkey leaves the oven. A nearby clear path means you can take a direct route instead of turning or stepping around people while holding the pan.
Follow the pan maker’s temperature and handling instructions. Avoid sudden temperature changes, which can damage some materials, and don’t assume a pan can go from a hot oven onto a cold or wet surface. A damaged or warped pan may no longer sit level, making it harder to carry and increasing spill risk, so inspect it before roasting.
Know when the turkey is done—and make gravy from the drippings
A roasting pan cannot tell you when a turkey is safe to eat; use a food thermometer to check its internal temperature. The USDA recommends at least 165°F (74°C) in the thickest part of the breast and the innermost thigh and wing. Color and cooking time alone are not reliable doneness checks. The pan supports the bird and collects juices, but it cannot measure the temperature inside meat, where doneness can vary from one area to another.
That distinction matters when the skin turns deep golden but the thickest part of the breast is still below the target. Keep roasting and check again with the thermometer rather than trusting the color. Position the thermometer carefully and follow the thermometer maker’s instructions for accurate readings. Checking more than one location helps catch uneven cooking, so a reading from one warm spot does not stand in for the whole bird.
The drippings during oven roasting can form the base of gravy. If your pan is rated for stovetop use and compatible with your burner, you may be able to use it to loosen browned bits and build flavor. Read the maker’s guidance first; metal pans vary in burner compatibility, and some coated pans are not meant for stovetop cooking. Using the roasting pan can save a transfer and help scrape up browned flavor, but it is only convenient when the pan is stable and approved for that heat source.
Once the turkey is out, handle the pan with oven mitts and set it on a heat-safe surface. A cook who wants gravy can pour the drippings into a separator or carefully use the pan only if its instructions allow it. If you plan to clean the pan, let it cool first and avoid a sudden temperature shock. The drippings remain hot after roasting, so giving the pan a secure place to rest also prevents accidental contact while you finish the meal.
Clean stuck-on drippings without damaging the pan
To clean a roasting pan with stuck-on drippings, let it cool, soak it in warm water with dish soap, and scrub with a tool suited to its material. A 15-minute soak can loosen browned bits enough to make cleanup easier. Check the pan maker’s care instructions before using abrasive pads, strong cleaners, or a dishwasher. Soaking softens the residue so you can lift it with less force; that matters because aggressive scrubbing may remove a coating or leave scratches that trap grime later.
For example, after gravy-making leaves a dark ring on a stainless steel pan, warm soapy water can soften residue while you serve dinner. A wooden or nonabrasive utensil may help lift softened bits. A coated pan calls for gentler handling, since a scratch can damage the surface; a scrubber that works on stainless may be too harsh for a coating. The right tool depends on the finish, so an extra few minutes of soaking can be a better trade than applying more pressure.
If you used a bed of vegetables, remove it before the juices dry into the pan. Strain the drippings for gravy, then soak the pan once it has cooled enough to handle safely. Don’t pour cold water into a very hot pan: sudden temperature changes can harm some materials. Leaving residue until it dries makes cleanup harder because sugars and proteins can cling firmly, so clearing the pan after dinner is usually easier than tackling it the next day.
Cleanup also offers a reason to choose a pan for more than one meal. Many roasting pans can handle large cuts of meat or vegetables, provided the recipe fits the pan and stays within its temperature limits. A pan that comes out for Sunday vegetables as well as holiday turkey earns its storage space. Frequent use spreads the value of a durable pan across more meals, while a heavier pan may take more cupboard room and effort to wash; choose based on how often you will realistically bring it out.
Frequently Asked Questions
What size roasting pan do I need for my turkey?
Choose a pan that fits the turkey without crowding it and fits level inside your oven. Check both the pan’s interior dimensions and its exterior dimensions, including handles, then leave room around the bird for airflow.
Do I need a rack to roast a turkey?
No. A rack lifts the turkey above the pan and can improve airflow, but sturdy vegetables can raise it if you don’t have one. The vegetables may soften and cook differently from a separate side dish.
Can I roast a turkey in a disposable foil pan?
Yes, if the pan is oven-safe and strong enough for the bird, but support it with a rigid baking sheet before filling it. This makes the pan easier to carry and helps reduce bending and spills.
How do I know the turkey is safely cooked?
Use a food thermometer rather than judging by color or cooking time. The USDA recommends checking the thickest breast and the innermost thigh and wing for at least 165°F (74°C).
Can I use my roasting pan on the stovetop for gravy?
Only if the manufacturer says the pan is safe for stovetop use and compatible with your burner. Check its instructions before heating drippings in the pan, since compatibility varies by material and model.
How do I clean burnt-on turkey drippings?
Let the pan cool, then soak it in warm soapy water before scrubbing with a tool suited to its material. Follow the maker’s care instructions, especially for coated pans, and avoid sudden temperature changes.
Conclusion
Choose your pan by measuring the bird and the oven, then pick a material and support style that suit how you cook. A sturdy base, safe handles, and enough room for airflow make the roast easier to manage; a thermometer confirms when it is ready.
Get those details right and the pan becomes the quiet helper beneath a golden turkey, catching the savory drippings that make the kitchen smell like dinner.